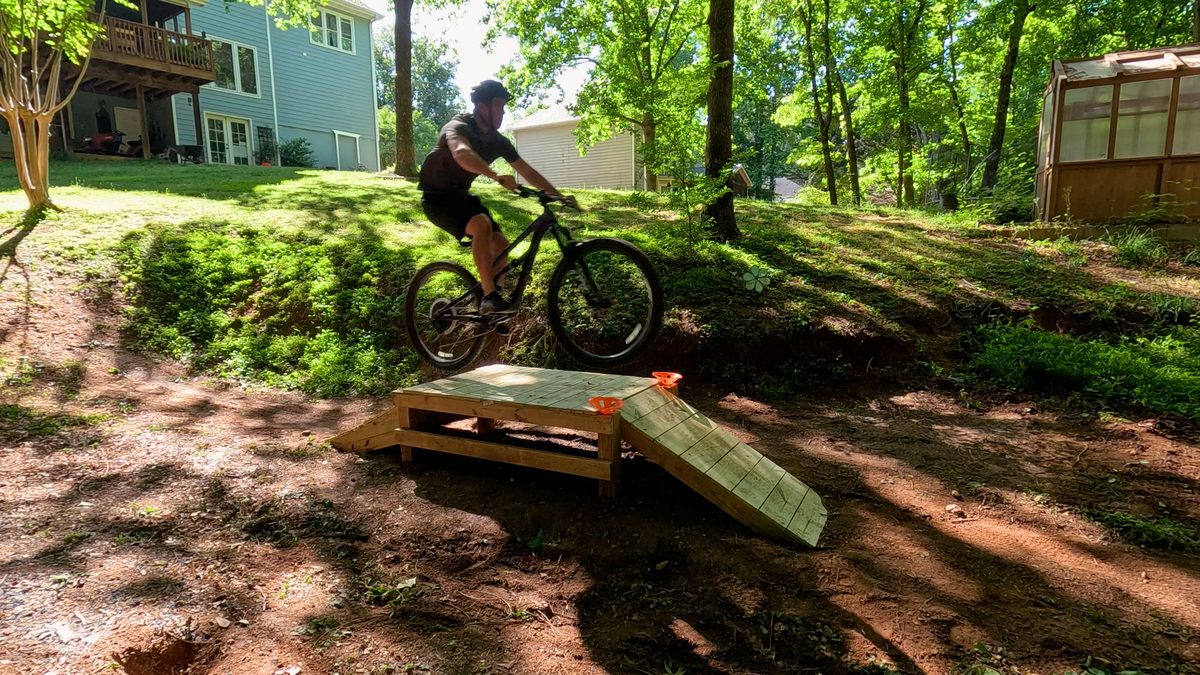
If you’re looking for a cool project you can build with your kids in a few hours, you’ve landed on the right post. Here’s everything you need to know to craft an awesome DIY bike ramp that your young riders will be excited to get out and use time and again. Start with the video, then read on for tips and details. (Interested in a full table top jump? Check out our new build here).
This year we’ve been getting into mountain biking at our local trails. There are a few courses with jumps that we want to get better at, so we needed a way to practice around our neighborhood. That’s why we were excited to see a mountain biking youtube channel we follow, Berm Peak, post a tutorial for a small kicker ramp.
As soon as my kids saw the video they wanted to make a ramp of our own. But that original video was designed for adults, so the first jump we built ended up being way too aggressive for small bikers… as in, “Houston we have liftoff" aggressive.
To avoid a trip to the emergency room, we experimented and found dimensions that are a better fit for the various sizes and skill levels of our kids. During this process, we ended up creating three different ramps. Like Goldilocks, you’ll need to decide which one is just right for your riders.

Here are example dimensions for the profile of the large ramp. Just swap out the measurements if you want to build one of the smaller options:

One thing to keep in mind: If a kid isn’t confident enough to carry sufficient speed to launch off the jump and land on their back wheel first, then they are going to roll over the ramp with their front wheel hitting the ground first. This is fine unless the ramp is too big for the wheel size. In that case, the bike will bottom out and the frame will hit the top of the ramp. That is why we are recommending ramps based on wheel sizes.
Once you’ve landed on the right size ramp for your situation, you’ll need to head to your local home improvement store to pick up some supplies. The list below will likely be enough to create two ramps, so even if you aren’t quite sure what size is best, you can always start small and then go larger on the second round. The total cost is ~$50 or so.

A few notes: There are a lot of options when it comes to plywood. Because the finished ramps are small enough to store in a garage, you don’t need any fancy weather treatments. We got the cheapest thing we could find that is around ~1/2". (Actual thickness is 15/32 – plywood is weird like that). Keep in mind that if you get something too thick, it will be hard to bend the top surface to fit the curve of the ramp.
To make it easier to transport inside your vehicle, you can usually have them cut the 4x8’ sheet in half at the store for free. Otherwise, you’ll be strapping it on top.
Here are the basic tools you’ll need to cut the plywood and 2x4s and then screw them together:

Once you’ve got all the materials, it’s time to start measuring and cutting. Draw out the profile of one sidewall of the ramp on the plywood. Here’s how:
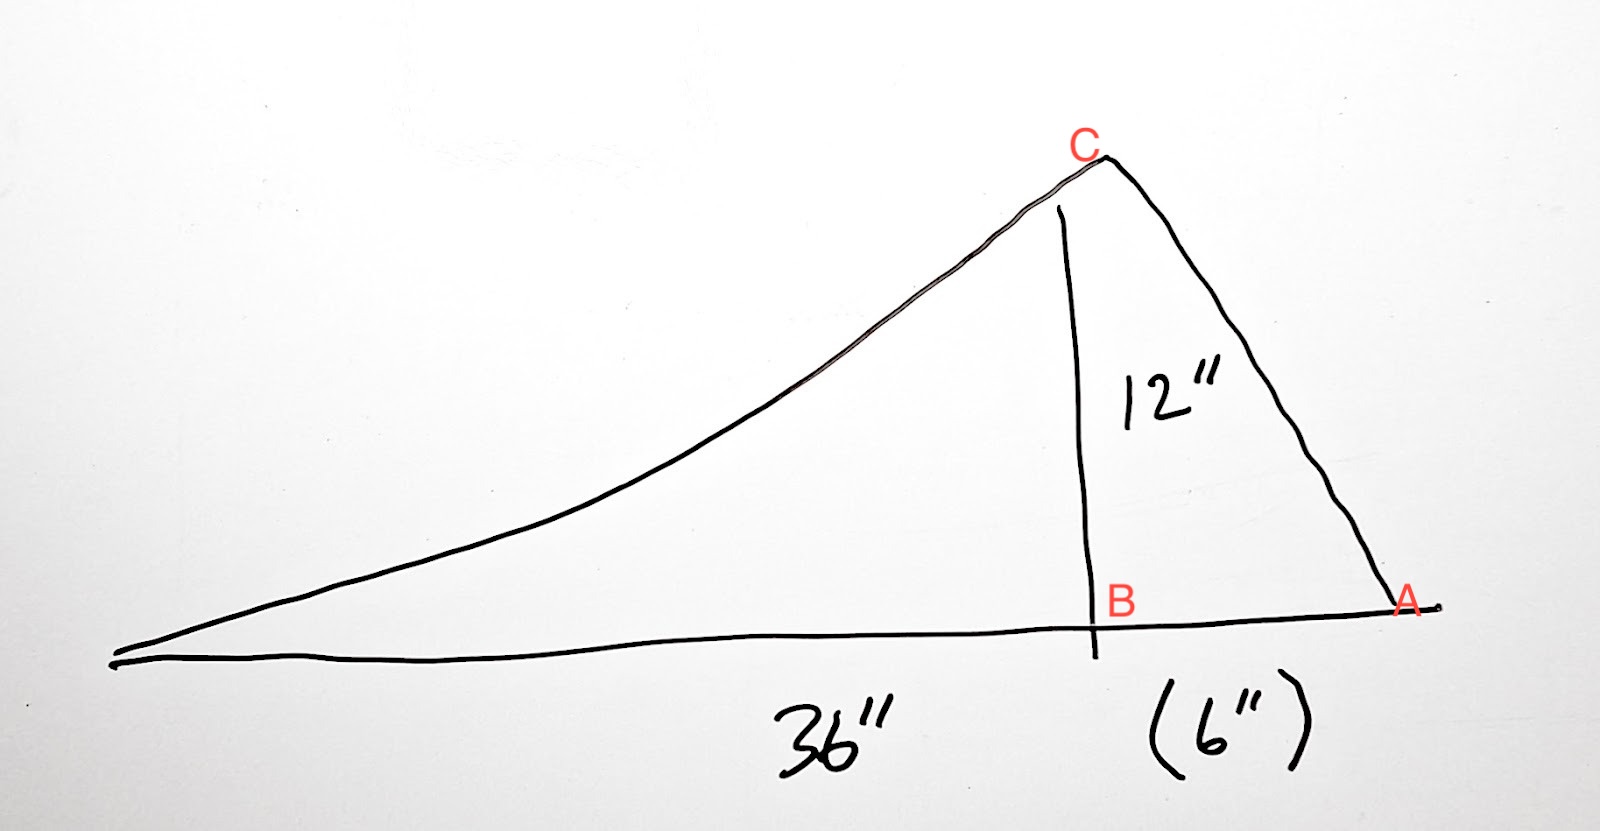
Use a a factory edge for the bottom
Measure the length of the ramp (36” for large) and make a mark along the bottom ("A" in above picture)
Now subtract the downslope (6” for large) and make a second mark along the bottom ("B" in above picture)
At the downslope mark, measure the height of the ramp (12” up for large) and make a mark ("C" in above picture)
Use a straight edge to draw a line connecting mark "C" to "A" (this is the downslope)
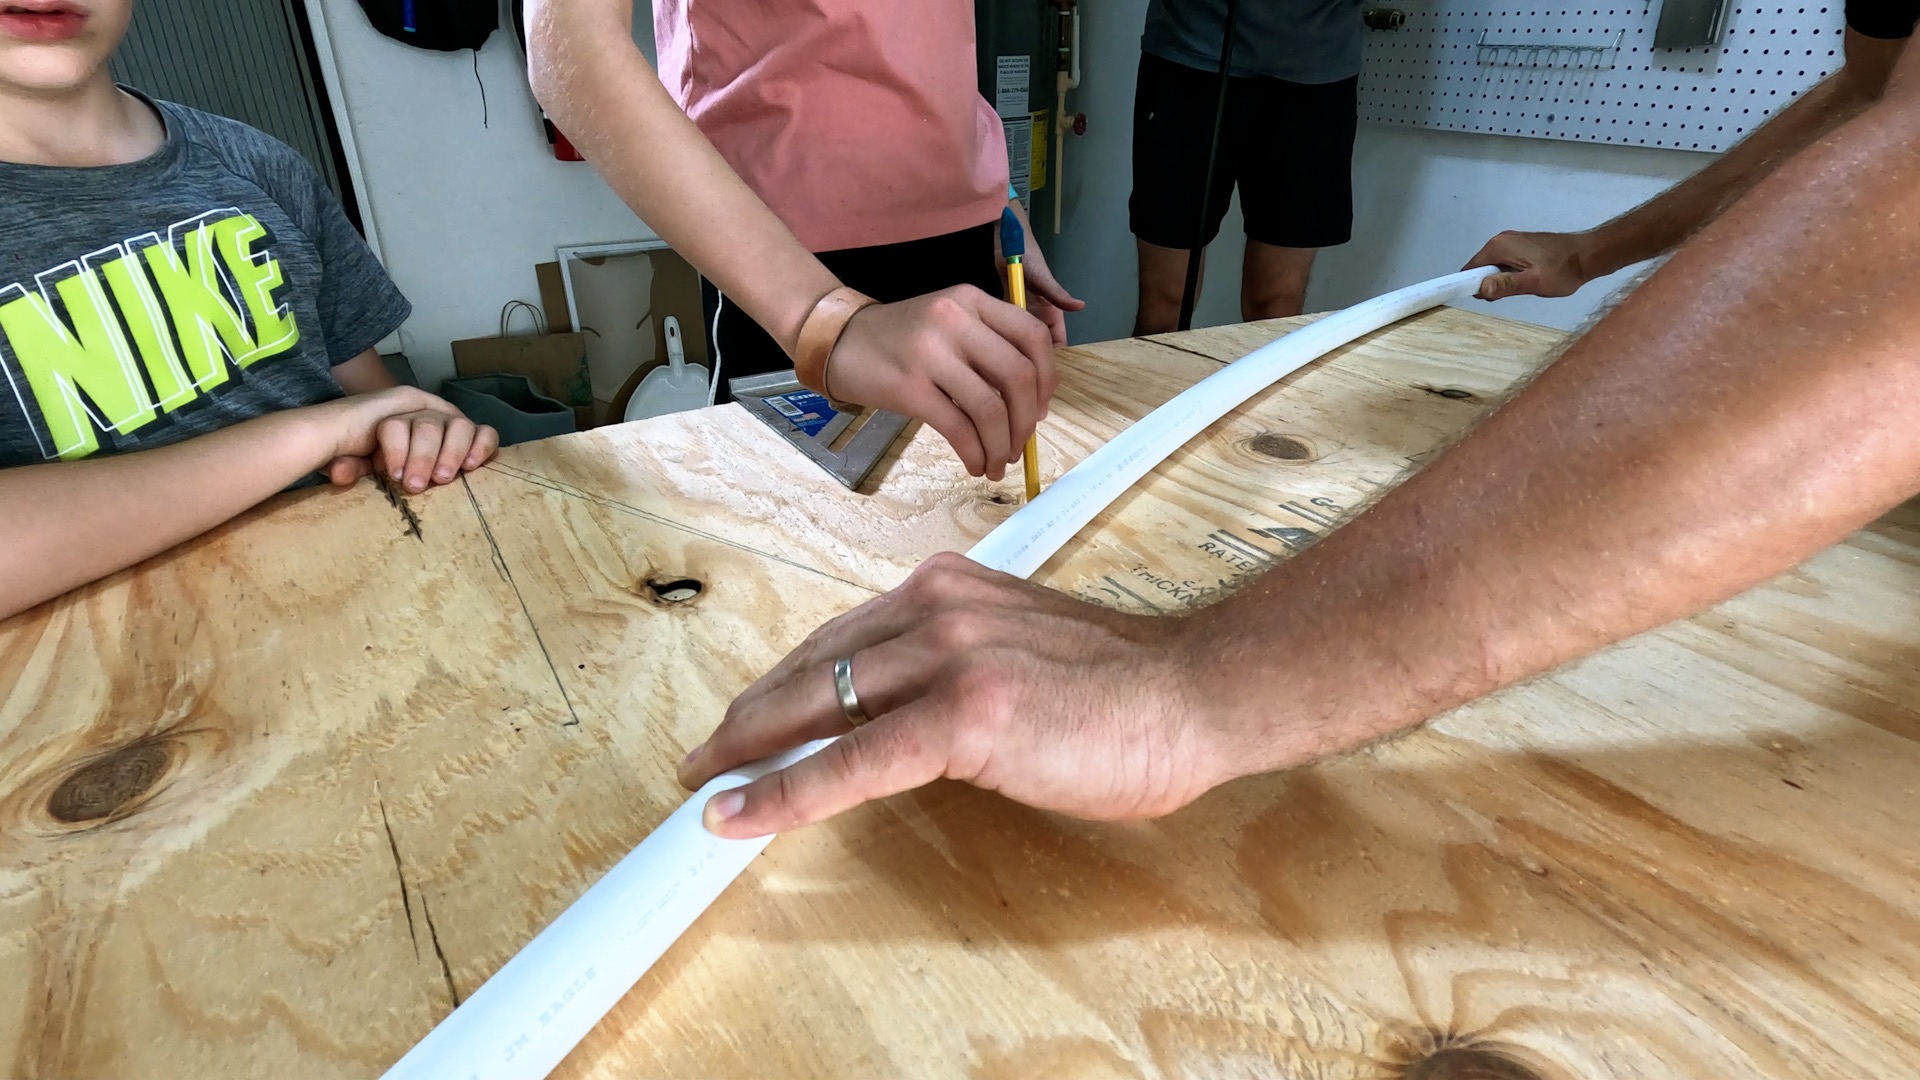
Now use a PVC pipe to trace a curve from the beginning of the ramp up to mark "C" (this is the up ramp)
Cut out the first side of your ramp with a jigsaw. Then use this as a template to trace out the second side on the plywood and cut that out too.
Next, you’ll need to cut out the top surface of the ramp, which is a big rectangle. Make this 16” wide. To figure out the length, use a flexible tape measure to figure out the actual distance along the top of your side wall profile and add an inch. Cut this shape out with your jigsaw.
Finally, cut the 2x4s into 15” pieces with a chop saw or hand saw (when you add the two ½” sidewall pieces that will get your ramp to the 16” total width). For the large ramp, you’ll need seven of these. Smaller ramps can get away with fewer.
Ok, assuming you haven’t lost any fingers during all that cutting, it's time to screw this thing together.
Start by screwing the side walls to the 2x4 struts. Place two struts flush with the downslope, two flush with the bottom, and three or so along the curve so they will support the top surface of the ramp. This should be done on a level surface, or the ramp will end up all warped. It should look something like this:
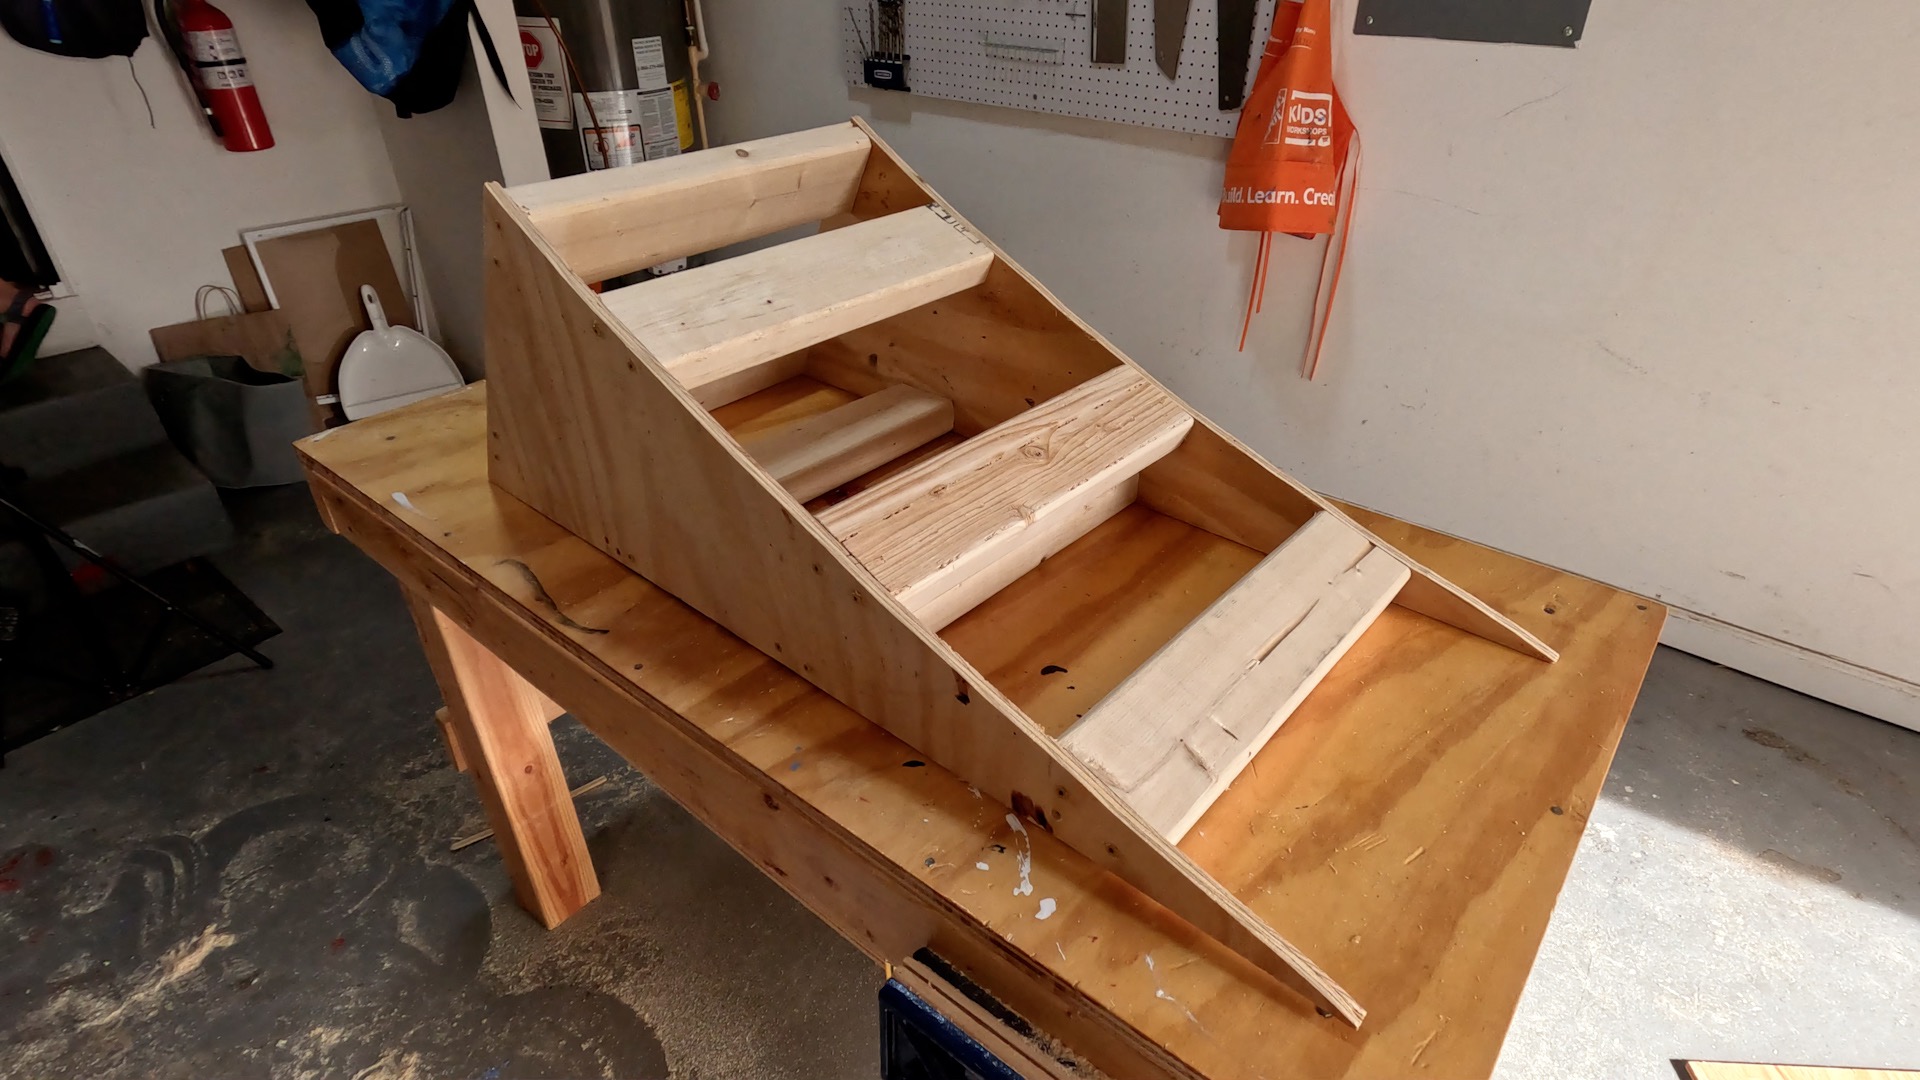
Now screw the top surface on. Start at the top and work your way down to the bottom so the plywood slowly bends to the curve of the ramp. It can help to have someone sit on the plywood while you’re screwing it in.
Once it is all together, sand off any potential splinters or rough edges, decorate the thing (optional), and you’re good to go!
Now get outside and test out your brand new jump ramp. These are easy to transport, so you can move them to the park or wherever there is a nice flat open area. For safety, start by angling the ramp so that riders land in the grass and make sure there’s enough recovery space after the jump to stop.

Here are some tips on good jumping form: After the jump, you ideally want both of your wheels landing around the same time (or your rear wheel slightly before the front). To achieve this you need sufficient speed. As you hit the ramp, have your pedals level, stand up slightly off your seat with bent knees and pull up a bit on your handle bars like you’re doing a wheelie.
As mentioned before, beginner riders are likely to roll over the ramp without flying much. Their front wheel will hit the ground first followed by the back. This is fine as long as the ramp isn’t too big. But over time encourage your kids to go faster and use the form above. Practice makes perfect.
And that is pretty much it. Enjoy your awesome ramp!
Interested in a full table top jump? Check out our new build here. Image below: